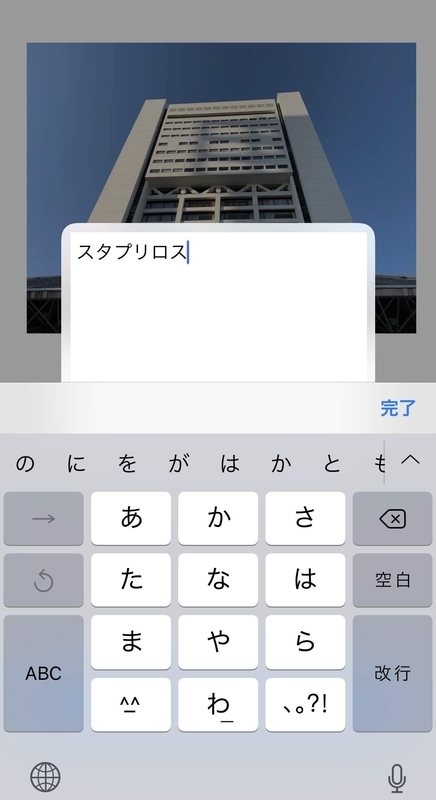
iOSアプリ開発を進めるにあたって、UIAlertControllerにUITextViewを追加する必要が出てきた。
UITextFieldなら数行のコードを追加するだけで良いのだが、UITextViewは少し苦労する。
特にキーボードを閉じる処理において凡ミスをやらかしてて時間を食ったので、将来同じミスをしないよう自分に向けてもこの記事を書いておく。
動きとしてはこんな感じ


全体のコード
UIAlertControllerにUITextViewを追加
ViewControllerにStoryboard上のUITextView(以下memoTextView)を接続し、memoTextViewタップするとUIAlertControllerが開くようになっている。
各部を見ていく
viewDidLoad
delegateもtagをつけるのも忘れないように
touchesBegan
memoTextViewがタップされた時の処理。
isTouchという関数を呼び出し、コンソールに「TextView touch!!」と表示されるようになっている。
memoTextViewのEditableとSelectableはオフにしておく。
関数 isTouch
タグのついたmemoTextViewがタップされた時の動作をここで書いていく。
let margin:CGFloat = 8.0
let rect = CGRect(x: margin, y: margin, width: 255, height: 150.0)
let customView = UITextView(frame: rect)
customView.backgroundColor = UIColor.white
customView.textColor = .black
customView.font = UIFont(name: "Helvetica", size: 16)
customView.text = memoTextView.text
customView.delegate = self
この部分でUIAlertControllerに追加するためのUITextView(customView)について書いている。
widthやheightはこのサイズにしておくとどの機種でも良い感じに表示されると思う。
ツールバーに完了ボタンの追加
テキストを入力後キーボードを閉じられるようにする
// ツールバー生成
let toolBar = UIToolbar(frame: CGRect(x: 0, y: 0, width: 320, height: 40))
// スタイルを設定
toolBar.barStyle = UIBarStyle.default
// 画面幅に合わせてサイズを変更
toolBar.sizeToFit()
// 閉じるボタンを右に配置
let spacer = UIBarButtonItem(barButtonSystemItem: UIBarButtonItem.SystemItem.flexibleSpace, target: self, action: nil)
// 閉じるボタン
let commitButton = UIBarButtonItem(barButtonSystemItem: UIBarButtonItem.SystemItem.done, target: self, action: #selector(commitButtonTapped))
// スペース、閉じるボタンを右側に配置
toolBar.items = [spacer, commitButton]
// textViewのキーボードにツールバーを設定
customView.inputAccessoryView = toolBar
ボタンが押された時にcommitButtonTappedという関数を呼び出す。
最後に
alertController.view.addSubview(customView)
でUIAlertControllerにcustomViewを追加したら、うまく表示されるようになっている。
関数 commitButtonTapped
@objc func commitButtonTapped() {
          self.view.endEditing(true)
      }
最初はこのように書いていたが、キーボードは閉じられなかった。
理由はもともとのviewの上にUIAlertControllerが表示されるような構造であるため、このコードは最前面にあるUIAlertControllerには効かなかったから。
 @objc func commitButtonTapped() {
        if var topController = UIApplication.shared.keyWindow?.rootViewController {
            while let presentedViewController = topController.presentedViewController {
                topController = presentedViewController
            }
            topController.view.endEditing(true)
        }

    }
このように最前面にあるUIAlertControllerを取得することで解決する。
タッチイベントのメソッド
class ToucheEventTextView: UITextView {

    override func touchesBegan(_ touches: Set<UITouch>, with event: UIEvent?) {
        if let next = next {
            next.touchesBegan(touches , with: event)
        } else {
            super.touchesBegan(touches , with: event)
        }
    }

    override func touchesEnded(_ touches: Set<UITouch>, with event: UIEvent?) {
        if let next = next {
            next.touchesEnded(touches , with: event)
        } else {
            super.touchesEnded(touches , with: event)
        }
    }

    override func touchesCancelled(_ touches: Set<UITouch>, with event: UIEvent?) {
        if let next = next {
            next.touchesCancelled(touches, with: event)
        } else {
            super.touchesCancelled(touches, with: event)
        }
    }

    override func touchesMoved(_ touches: Set<UITouch>, with event: UIEvent?) {
        if let next = next {
            next.touchesMoved(touches, with: event)
        } else {
            super.touchesMoved(touches, with: event)
        }
    }
}
これがないといくらmemoTextViewをタップしても動かない。
一覧にしてあるが、今回使っているのはtouchesBeganのみ。